Feature release 1.0.9.0 is ready
New release 1.0.9.0 is available for download, featuring many significant changes:
- tunXten is now available in two flavors – 32 and 64 bit. The installer automatically detects which OS you are running and installs the appropriate binaries. As old versions are 32-bit, they cannot auto-upgrade to 64-bit, so for users of any previous version it’s highly recommended to uninstall it first, them download the latest version and install it. All your existing OpenVPN configurations and application settings will not be affected. Also there’s absolutely no harm in continuing to use auto-updater, it will just upgrade to the latest 32-bit binaries, even on 64-bit OS.
- GUI now looks great on high-resolution displays. No more tiny icons!
- OpenVPN binaries updated to the latest version 2.3.10
- Improvements related to OpenVPN Access Server (enhanced config import process, tunXten can now work with PKCS#8 encrypted primary keys).
- Lots of minor bugfixes and improvements.
Full changelog is available here
Bugfix release 1.0.8.9 is out (OpenVPN updated to 2.3.8)
New bugfix release 1.0.8.9 is available for download, issues addressed are:
- Broken post-connect code (sometimes auto-launch shortcuts won’t start).
- A command-line bug that could cause high CPU usage in certain cases.
- A bug that could cause GUI freeze when another instance is called with command-line parameters.
- Some minor bugs in TAP adapter handling code.
- Right-click on the tray icon won’t always show the GUI.
OpenVPN binaries updated to the latest version 2.3.8
Google Authenticator is here
This new 1.0.8.8 release includes updated two-factor authentication, now it’s extremely easy to use tunXten with, for example, an OpenVPN Access Server instance which makes use of Google Authenticator for extra security. Now our software automatically detects any challenge requests made by a server and shows additional data entry fields in Logon dialog so a user can supply corresponding responses.
In addition to that the following changes have been introduced:
- OpenVPN binaries are updated to the latest and greatest version 2.3.7
- Chinese translation (thanks to Andy Lin)
- Minor GUI and command-line improvements, like:
– A visual hint about server address format added to “Import configuration from OpenVPN AS” dialog
– CLI commands operating on multiple configs now report the end of working session, which should help with writing automated scripts
– Auto-compact mode: on its first start tunXten detects if the number of found OpenVPN configs is greater than 10 and turns compact displaying mode ON - Bug with broken “TAP adapter → connected OpenVPN config” mapping fixed in Setting dialog, Advanced tab
No more Heartbleed!

The most important security-related topic this week is definitely the discovery of the Heartbleed Bug, which leverages a serious flaw in OpenSSL library, allowing remote attackers to read arbitrary chunks of memory from affected systems. Although it seems that only servers using OpenSSL are affected, OpenVPN guys were quick to provide patched versions of the cryptographic library thus eliminating the possibility of introducing the bug in their client software. Today we have released the new tunXten version 1.0.8.6, which includes the latest updates. All users are strongly advised to follow the upgrade procedure, either by downloading and running the installer or by manually forcing tunXten to check and apply the updates.
TAP driver installation failed
Several users have recently reported that sometimes clean setup of tunXten fails on TAP driver installation step, only Windows 7 and 8 seem to be affected.
We have investigated and fixed the issue, the downloadable installer is updated now and contains the latest TAP adapter driver. All our tests confirm there should be no issues now. So, if you are affected by this bug, please download the new installer and use it to update your current tunXten installation, all your settings will remain intact.
During our search for a solution an interesting thing caught our eyes – judging by google search results, it seems there are too many times when TAP adapter won’t install no matter what you do. And guess what – one of our test boxes has shown this very behavior! We spent a couple of hours trying every possible way to overcome cryptic errors, all to no avail.
Finally, this thread led us in the right direction and the solution was found at Cisco support forum, thanks to Patric Tran (who managed to persuade Microsoft to provide a fix) and to Jason Micari (who made the fixes available online).
So, we are duplicating these fixes here:
ifcleanup.exe for x86
ifcleanup.exe for x64
Regardless of the fact that the Cisco forum topic contained a discussion of AnyConnect issues, our unruly box in question has been successfully revived.
tunXten calls for UI translators!
The two major things about the new tunXten release 1.0.8.3 are these:
- Now it’s completely ready for localization. Yes, this means that tunXten can now be in your native language! If you are interested in helping us in this task, please drop us a line using support form (or “Send Feedback” link in the application’s About dialog), we’ll be happy to reward you with a personal license.
- OpenVPN upgraded to the latest version (2.3.2 at the time of writing), this means that all the new features, including full IPv6 support, are finally there.
There are also more changes, not so important but nonetheless worth noting:
- Autostart feature for shortcuts can now be toggled from a context menu.
- In compact mode it’s possible to show/hide the main window by left-clicking the tray icon.
- OpenVPN version can be seen in the About dialog.
And, as always, a couple of minor bugs are fixed.
User experience improved
The time has come for the new release 1.0.8.2, which includes mostly UI-related enhancements:
- Log viewer now has “Clear log” button which truncates the log.
- Log viewer now has autoadjusting horizontal scrollbar.
- Settings dialog – it’s now possible to define a system-wide hotkey to show/hide all pinned windows.
- Settings dialog – “OpenVPN configuration files location” display moved from General to Advanced tab.
- Updated: Transparency level control moved from the main window to the Settings dialog (General tab).
- Updated: Transparency level is now set to zero by default.
- Updated: Now all changes are saved to corresponding ini-files immediately, not just on graceful application exit.
Security tokens handling improvements
Here comes a small bugfix release, mostly concerning PKCS#11-related things. This is the complete list of changes:
- Fixed possible crash when wrong Private Key passsword is entered.
- Eliminated endless reconnection loop when wrong PIN for a SmartCard is provided.
- When there’s only one PKCS#11 ID is present on a SmartCard, it’s used silently by default.
Currently there are no new exciting features, we have them planned for the next release :)
Making user experience even better
After a long while the new feature release 1.0.8.0 is ready at last. The most important changes are:
- Edit Configuration button is now available directly in Log Viewer, this should allow quick editing and testing the changes without leaving the log window:

- A number of pictures for configuration windows in extended mode now bundled with the installer and available in PROGRAMFILES\tunXten\images\config
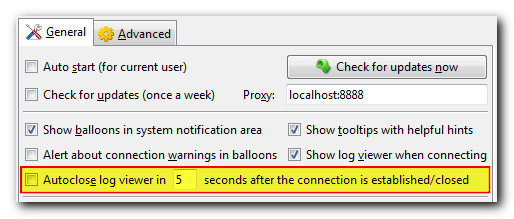
- A new option for autoclosing a connection log after successful connect/disconnect event

- Any shortcut now sports a context menu, simplifying common operations:
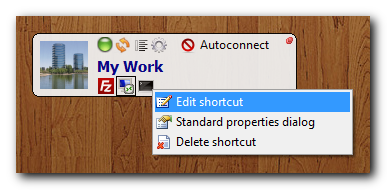
These action can also be triggered by using the following combinations:
| Ctrl+RClick | Custom edit shortcut dialog |
| Alt+RClick | Windows Explorer standard properties dialog |
| Shift+RClick | Delete shortcut |
- When saving OpenVPN logon credentials the username is now stored encrypted just like the password.
Some minor bugs were also fixed, like these:
- Some PKCS#11 identificators were not displayed correctly
- Several visual glitches in compact mode
- Sometimes individual configuration windows in extended mode lost their “on top” attribute
- Changes made to shortcuts were not reflected in the GUI
Using tunXten with PrivateTunnel
This post opens a series of articles describing how to use tunXten with different OpenVPN providers, whose numbers grow every day.
A word of caution – for the time being we’re not going to give a thorough review of every provider’s features, pros and cons of using one or another, or express any opinions regarding their quality of service – we just assume that one just has an account with the provider and wants to use tunXten with it instead of using their bundled client (which may not even be there).
Without further ado, let us introduce today’s provider – PrivateTunnel.
It provides access to OpenVPN servers in United States, United Kingdom, Canada and Switzerland. So, we’re gonna set up tunXten so it will be able to connect to any of these servers. To get their addresses on the internet we need to login to the provider’s web interface:

After we’re successfully in, we’ll see a combobox, which allows us to select a server we want to connect to:

Actual addresses are hidden in the web page source, you can look them up by using “View Source” option in your browser (hit Ctrl+U in FireFox/Chrome or Alt+V+C in Internet Explorer):
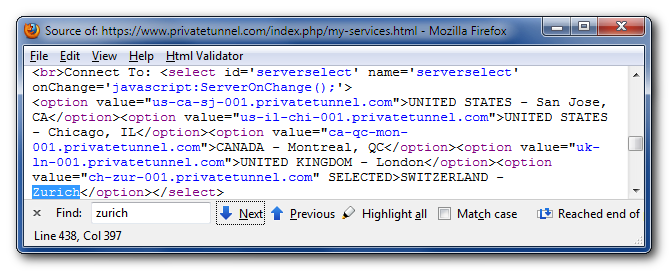
So here they are, conveniently formatted as a human-readable list:
 |
us-ca-sj-001.privatetunnel.com | United States – San Jose, CA |
 |
us-il-chi-001.privatetunnel.com | United States – Chicago, IL |
 |
ca-qc-mon-001.privatetunnel.com | Canada – Montreal, QC |
 |
uk-ln-001.privatetunnel.com | United Kingdom – London |
 |
ch-zur-001.privatetunnel.com | Switzerland – Zurich |
Now, it’s very easy to have these servers configured in tunXten – just open the Import dialog, select “I want to import my configs from OpenVPN Access Server”, enter the address of any server you like from the list above, and specify you account credentials:
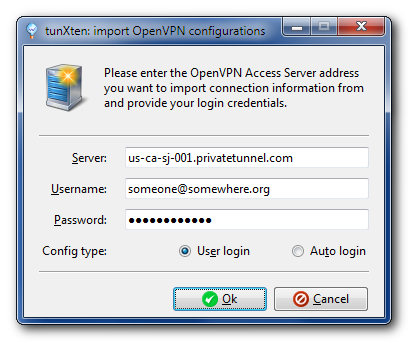
When you press the Ok button, the application automatically downloads the configuration from the remote server and makes it available for immediate use:
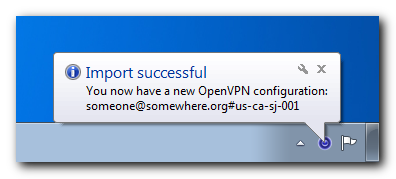
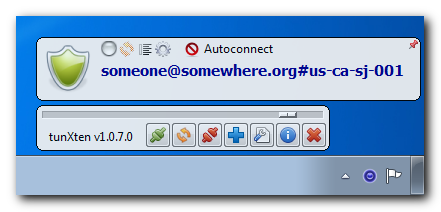
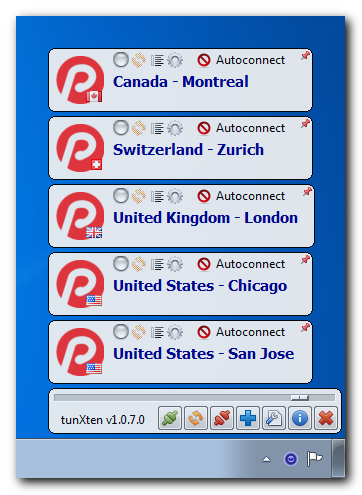
You can even import configurations from all PrivateTunnel servers to easily access any of them. Here’s what our setup looks like:
Now let’s check if it really works. First, we’ll try to connect to, say, London server:

Well, seems our connection is successfully established, let’s see now:
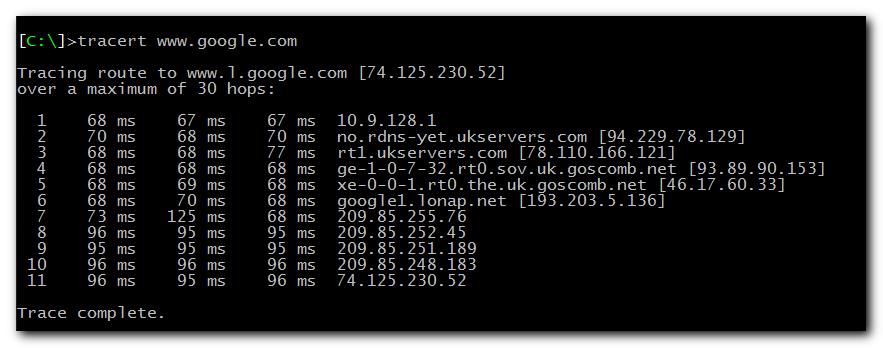
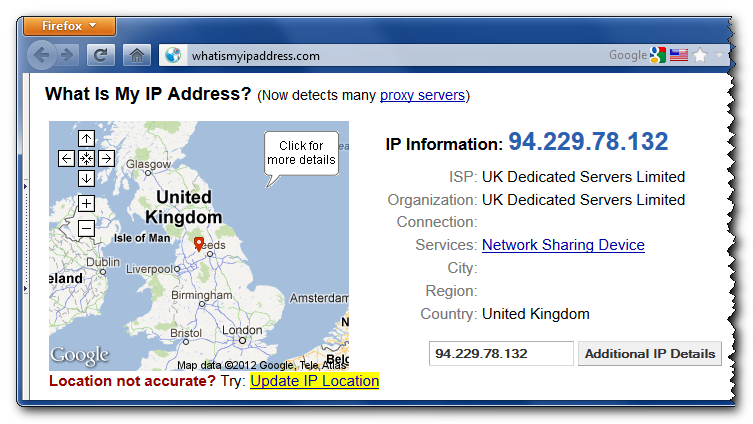
As you can see, all our network traffic now really goes through the UK server, so we can happily browse the internet feeling warm, fuzzy and secure.
Summertime discount 30% off!
For those who have missed the announcement on our home page: starting today, we’re offering a discount of 30% effective till July 6th. Don’t hesitate to grab your licensed copy!
OpenVPN Access Server (OpenVPN-AS) support and PKCS#11 improvements
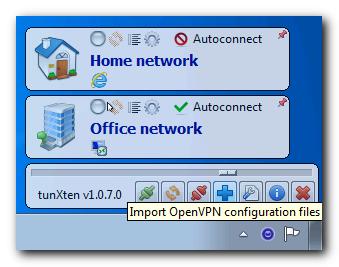
The new release 1.0.7 brings full support of OpenVPN Access Server – now it’s super-easy to import client configurations from remote servers. Just press Import button in the application’s main toolbar, select importing from OpenVPN-AS server, enter the server address and your credentials – that’s all, tunXten will automatically download and import your config, it’s as easy as that:


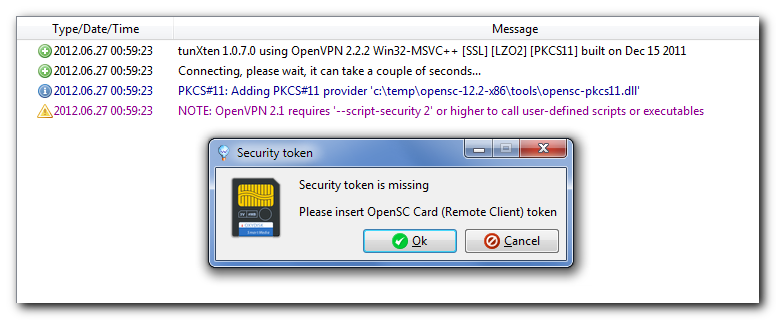
Also there’s a great improvement of PKCS#11 support – now tunXten responds to any event that might require attention and ask the user for input when necessary. For example, here’s the prompt to insert a missing security token:
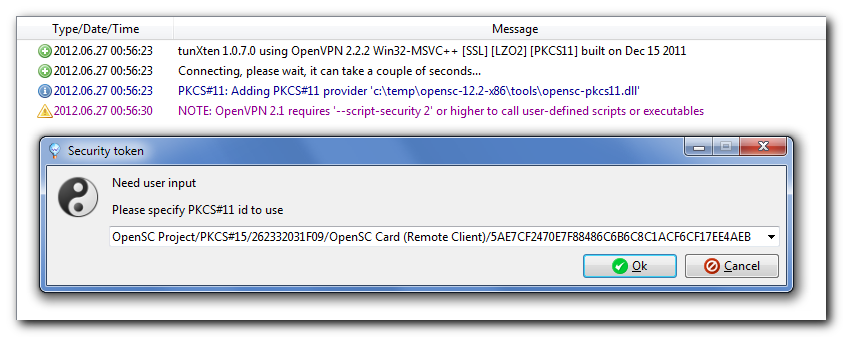
And here’s the list of automatically detected IDs on a security token, a user just has to select the one they need:
OpenVPN and PKCS#11 security tokens/smartcards
A couple of days ago I came across an interesting device – Aladdin eToken Pro 32k – and decided to give it a try and use it as a PKCS#11-compliant key/certificate storage for the two-factor authentication process on our OpenVPN server. So here’s how I made it all work on my Windows 7 Professional 64bit workstation.
The first thing I did was plug the token into the USB port and sure enough my Windows immediately told me that it couldn’t find any suitable drivers:

Well, that set me on a quest to make my OS recognize the device, and a couple of minutes later I was downloading a software package from the eToken manufacturer site. The package looked quite fat to contain just the drivers, so I thought (not without reason) that it would also install me a bunch of programs I won’t ever need:

Indeed, installation took just about 30 mb, launched the eToken PKI client in the background and set it to autostart, however, the only things really needed are the smart card reader drivers:
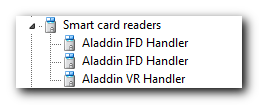
I was not going to use the bundled software for my task, instead I aimed for the OpenSC project (there are several good tutorials on the web about how to prepare a security token for use with OpenVPN), so I disabled the Aladdin client and downloaded an OpenSC package version 12.2 (at the time of this writing) and checked whether it saw my virtual card readers:
[ C:\Program Files\OpenSC Project\OpenSC\tools ]> opensc-tool --list-readers
# Detected readers (pcsc)
Nr. Card Features Name
0 Yes AKS ifdh 0
1 Yes AKS ifdh 1
2 Yes AKS VR 0
[ C:\Program Files\OpenSC Project\OpenSC\tools ]> opensc-tool --atr
Using reader with a card: AKS ifdh 0
36:f2:98:00:ff:c1:10:31:fe:55:c8:03:15
[ C:\Program Files\OpenSC Project\OpenSC\tools ]> opensc-tool --serial
Using reader with a card: AKS ifdh 0
26 23 32 03 1F 09 ...
[ C:\Program Files\OpenSC Project\OpenSC\tools ]> opensc-tool --name
Using reader with a card: AKS ifdh 0
CardOS M4
Everything seemed to be all right, so it was time to get my private keys and certificates for accessing our OpenVPN server. This data has to be generated on the OpenVPN server in the PKC#12 format:
bash $ ./build-key-pkcs12 remote-client
Generating a 1024 bit RSA private key
..............................................++++++
........++++++
writing new private key to ‘remote-client.key’
----
You are about to be asked to enter information that will be incorporated
into your certificate request.
What you are about to enter is what is called a Distinguished Name or a DN.
There are quite a few fields but you can leave some blank
For some fields there will be a default value,
If you enter ‘.’, the field will be left blank.
----
Country Name (2 letter code) [XX]:
State or Province Name (full name) [XX]:
Locality Name (eg, city) [XXXXXX]:
Organization Name (eg, company) [XXXXXXXXXXXXXXXXX]:
Organizational Unit Name (eg, section) [XXXXXXXX]:
Common Name (eg, your name or your server’s hostname) [remote-client]:
Name [XXXXXX]:
Email Address [XXXXXXXXXXXXXXXXX]:
Please enter the following ‘extra’ attributes
to be sent with your certificate request
A challenge password []:
An optional company name []:
Using configuration from /usr/local/etc/openvpn/openss1-0.9.8.cnf
Check that the request matches the signature
Signature ok
The Subject’s Distinguished Name is as follows
countryName :PRINTABLE:
stateOrProvinceName :PRINTABLE:
localityName :PRINTABLE:
organizationName :PRINTABLE:
organizationalUnitName:PRINTABLE:
commonName :PRINTABLE:
name :PRINTABLE:
emailAddress :IA5STRING:
Certificate is to be certified until May 18 13:43:34 2022 GMT (3650 days)
Sign the certificate? [y/n]:y
1 out of 1 certificate requests certified, commit? [y/n]y
Write out database with 1 new entries
Data Base Updated
Enter Export Password:
Verifying – Enter Export Password:
Afterwards, I copied all the necessary files to my Windows workstation and placed them in a temporary folder:

Next thing I did was prepare my eToken for storing the data I’ve generated on the OpenVPN server, and this is where I met the first serious showstopper – OpenSC tools 12.2 refused to create PKCS#15 structures and new PINs on a freshly initialized card:
[ C:\Program Files\OpenSC Project\OpenSC\tools ]> opensc-tool --info
opensc 0.12.2 [Microsoft 1600]
Enabled features:pcsc openssl zlib
[ C:\Program Files\OpenSC Project\OpenSC\tools ]> pkcs15-init --erase-card
Using reader with a card: AKS ifdh 0
[ C:\Program Files\OpenSC Project\OpenSC\tools ]> pkcs15-init --create-pkcs15
Using reader with a card: AKS ifdh 0
Failed to read PIN: Not supported
Failed to create PKCS #15 meta structure: Generic PKCS#15 initialization error
After much trial and error I found out that the only way to do this in my case was to launch these commands under a virtual machine running Windows XP, and the version of OpenSC package has to be 12.0, more recent versions don’t work:

After that everything went smooth:
[ C:\Program Files\OpenSC Project\OpenSC\tools ]> pkcs15-tool --list-pins
Using reader with a card: AKS ifdh 0
PIN [User PIN]
Object Flags : [0×3], private, modifiable
ID : 01
Flags : [0×32], local, initialized, needs-padding
Length : min_len:4, max_len:8, stored_len:8
Pad char : 0×00
Reference : 1
Type : ascii-numeric
Path : 3f005015
[ C:\Program Files\OpenSC Project\OpenSC\tools ]> pkcs15-init -S d:\Temp\certs\emote-client.p12 -f PKCS12 -a 01
Using reader with a card: AKS ifdh 0
error:23076071:PKCS12 routines:PKCS12_parsemac verify failure
Please enter passphrase to unlock secret key: Importing 2 certificates:
0: xxxxxxxxxxxxxxxxxxxxxxxxxxxxxxxxxxxxxxxxxxxxxxxxxxxxxxxxxxxxxxxxxx
1: zzzzzzzzzzzzzzzzzzzzzzzzzzzzzzzzzzzzzzzzzzzzzzzzzzzzzzzzzzzzzzzzzz
User PIN [Remote Client] required.
Please enter User PIN [Remote Client]:
[ C:\Program Files\OpenSC Project\OpenSC\tools ]> pkcs15-tool --list-certificates
Using reader with a card: AKS ifdh 0
X.509 Certificate [xxxxxxxxxxxxxxxxxxxxxxxxxxxxxxxxxxxxxxxxxxxxxxxxxxxxxxxxxxxxxxxxxx]
Object Flags : [0×2], modifiable
Authority : no
Path : 3f0050153104
ID : 5ae7cf2470e7f88486c6b6c8c1acf6cf17ee4aeb
GUID : {5ae7cf24-70e7-f884-86c6-b6c8c1acf6cf}
Encoded serial : 02 01 07
X.509 Certificate [zzzzzzzzzzzzzzzzzzzzzzzzzzzzzzzzzzzzzzzzzzzzzzzzzzzzzzzzzzzzzzzzzz]
Object Flags : [0×2], modifiable
Authority : yes
Path : 3f0050153105
ID : 8ca5bf81c40a7ada2c8a0d88e7cca3ce0626fb1a
GUID : {8ca5bf81-c40a-7ada-2c8a-Od88e7cca3ce}
Encoded serial : 02 09 00FE98DC7083D361E9
[ C:\Program Files\OpenSC Project\OpenSC\tools ]> pkcs15-tool --list-keys
Using reader with a card: AKS ifdh 0
Private RSA Key [Private Key]
Object Flags : [0×3], private, modifiable
Usage : [0xC], sign, signRecover
Access Flags : [0×0]
ModLength : 1024
Key ref : 16 (0×10)
Native : yes
Path : 3f005015
Auth ID : 01
ID : 5ae7cf2470e7f88486c6b6c8c1acf6cf17ee4aeb
GUID : {5ae7cf24-70e7-f884-86c6-b6c8c1acf6cf}
The only thing remained is to configure OpenVPN to use this brand-new eToken with my keys. I checked if the openvpn binary could correctly identify my data on the cryptographic token (notice that I did not use the opensc-pkcs11 library installed on my system, because it is 64bit and the openvpn binary is 32bit, so they don’t play together, I had to use 32bit opensc-pkcs11 library):
[ C:\ ]> openvpn --show-pkcs11-ids c:\Windows\system32\opensc-pkcs11.d11
Tue May 29 18:33:50 2012 PKCS#11: Cannot add provider ‘c:\Windows\system32\opensc-pkcs11.dll’ 6-‘CKR_FUNCTION_FAILED’
Tue May 29 18:33:50 2012 Exiting
[ C:\ ]> cd temp\opensc-12.2-x86\tools
[ C:\Temp\opensc-12.2-x86\tools ]> openvpn --show-pkcs11-ids opensc-pkcs11.dll
The following objects are available for use.
Each object shown below may be used as parameter to
--pkcs11-id option please remember to use single quote mark.
Certificate
DN: [zzzzzzzzzzzzzzzzzzzzzzzzzzzzzzzzzzzzzzzzzzzzzzzzzzzzzzzzzzzzzzzzzz]
Serial: 07
Serialized id: OpenSC\x20Project/PKCS\x2315/262332031F09/OpenSC\x20Card\x20\x28Remote\x20Client\x29/xxxxxxx
To make my configuration load the certificates/keys from the eToken, I added the following line to my openvpn config file (the ID used is the “serialized id” string from the previous screenshot):
client
dev tap
proto tcp
remote my-openvpn-server 1234
nobind
persist-key
persist-tun
comp-lzo
verb 3
# -- Keys and certificates.
ns-cert-type server
tls-auth ta.key 1
ca ca.crt
pkcs11-providers c:\\temp\\opensc-12.2-x86\\tools\\opensc-pkcs11.dll
pkcs11-id ‘OpenSC\x20Project/PKCS\x2315/262332031F09/OpenSC\x20Card\x20\x28Remote\x20Client\x29/xxxxxxx’
After everything was done, I launched openvpn with my connection configuration and was asked for my PIN code to access the secure eToken storage, and after several seconds I was successully connected to my openvpn server:
[ C:\Temp\openvpn ]> dir
Volume in drive C is System Serial number is 1894:5e67
Directory of C:\Temp\openvpn\*
29.05.2012 19:48 <DIR> .
29.05.2012 19:48 <DIR> ..
16.05.2012 0:16 1 460 ca.crt
29.05.2012 20:23 406 etoken.ovpn
16.05.2012 0:57 636 ta.key
2 502 bytes in 3 files and 2 dirs 12 288 bytes allocated
9 383 129 088 bytes free
[ C:\Temp\openvpn ]> openvpn --config etoken.ovpn --verb 3
Tue May 29 20:35:42 2012 OpenVPN 2.2.2 Win32-MSVC++ ESSL] [LZ02] [PKCS11] built on Dec 15 2011
Tue May 29 20:35:42 2012 PKCS#11: Adding PKCS#11 provider ‘c:\temp\opensc-12.2-x86\tools\opensc-pkcs11.dll’
Tue May 29 20:35:48 2012 NOTE: OpenVPN 2.1 requires ‘--script-security 2’ or higher to call user-defined scripts or executables
Tue May 29 20:35:49 2012 Control Channel Authentication: using ‘ta.key’ as a OpenVPN static key file
Tue May 29 20:35:49 2012 Outgoing Control Channel Authentication: Using 160 bit message hash ‘SHA1’ for HMAC authentication
Tue May 29 20:35:49 2012 Incoming Control Channel Authentication: Using 160 bit message hash ‘SHA1’ for HMAC authentication
Tue May 29 20:35:49 2012 LZO compression initialized
Tue May 29 20:35:49 2012 Control Channel MTU parms [ L:1576 D:168 EF:68 EB:0 ET:0 EL:0 ]
Tue May 29 20:35:49 2012 Socket Buffers: R=[8192→8192] S=[8192→8192]
Tue May 29 20:35:49 2012 Data Channel MTU parms [ L:1576 D:1450 EF:44 EB:135 ET:32 EL:0 AF:3/1 ]
Tue May 29 20:35:49 2012 Local Options hash (VER=V4): ‘e39a3273’
Tue May 29 20:35:49 2012 Expected Remote Options hash (VER=V4): ‘3c14feac’
Tue May 29 20:35:49 2012 Attempting to establish TCP connection with 127.0.0.1:1234
Tue May 29 20:35:49 2012 TCP connection established with 127.0.0.1:1234
Tue May 29 20:35:49 2012 TCPv4_CLIENT link local: [undef]
Tue May 29 20:35:49 2012 TCPv4_CLIENT link remote: 127.0.0.1:1234
Tue May 29 20:35:49 2012 TLS: Initial packet from 127.0.0.1:1234, sid=4c7594ab 55ebb12a
Tue May 29 20:35:50 2012 VERIFY OK: depth=1, /C=XX/ST=XX/L=XXXXXXXX/O=XXXXXXXXX/OU=XXXXXXXX/CN=XXXXXXXXX/name=read
Tue May 29 20:35:50 2012 VERIFY OK: nsCertType=SERVER
Tue May 29 20:35:50 2012 VERIFY OK: depth=0, /C=XX/ST=XX/L=XXXXXXXX/O=XXXXXXXXX/OU=XXXXXXXX/CN=XXXXXXXXX/name=read
Enter OpenSC Card (Remote Client) token Password:
Tue May 29 20:35:57 2012 Data Channel Encrypt: Cipher ‘BF-CBC’ initialized with 128 bit key
Tue May 29 20:35:57 2012 Data Channel Encrypt: Using 160 bit message hash ‘SHA1’ for HMAC authentication
Tue May 29 20:35:57 2012 Data Channel Decrypt: Cipher ‘BF-CBC’ initialized with 128 bit key
Tue May 29 20:35:57 2012 Data Channel Decrypt: Using 160 bit message hash ‘SHA1’ for HMAC authentication
Tue May 29 20:35:57 2012 Control Channel: TLSvl, cipher TLSv1/SSLv3 DHE-RSA-AES256-SHA, 1024 bit RSA
Tue May 29 20:35:57 2012 [XXXXXX] Peer Connection Initiated with 127.0.0.1:1234
Tue May 29 20:35:59 2012 SENT CONTROL [XXXXXX]: ‘PUSH_REQUEST’ (status=1)
Tue May 29 20:35:59 2012 PUSH: Received control message: ‘PUSH_REPLY,route-gateway 10.8.0.1,ping 10,ping-restart 120’
Tue May 29 20:35:59 2012 OPTIONS IMPORT: timers and/or timeouts modified
Tue May 29 20:35:59 2012 OPTIONS IMPORT: --ifconfig/up options modified
Tue May 29 20:35:59 2012 OPTIONS IMPORT: route-related options modified
Tue May 29 20:35:59 2012 TAP-WIN32 device [Local Area Connection] opened: \\.\Global\{88E7903D-BD14-4093-8E58-77F3E29BEF05}.tap
Tue May 29 20:35:59 2012 TAP-Win32 Driver Version 9.9
Tue May 29 20:35:59 2012 TAP-Win32 MTU=1500
Tue May 29 20:35:59 2012 Notified TAP-Win32 driver to set a DHCP IP/netmask of 10.8.0.4/255.255.255.0 on interface
Tue May 29 20:35:59 2012 Successful ARP Flush on interface [37] {88E7903D-BD14-4093-8E58-77F3E29BEF05}
Tue May 29 20:36:04 2012 TEST ROUTES: 0/0 succeeded len=-1 ret=1 a=0 u/d=up
Tue May 29 20:36:04 2012 Initialization Sequence Completed
This is it for using cryptographic tokens with OpenVPN.
Bugfix release 1.0.6.1
It’s somewhat early for a new release, but we found a bug in our build process too late and the release 1.0.6 suffers from treating DES3-encrypted data incorrectly. So here’s a bugfix release 1.0.6.1 which eliminates this unfortunate glitch.
Better authentication process
Addressing our customers’ requests we have improved the look and feel of the authentication dialog. Now, in addition to simple username/password entry, tunXten 1.0.6 automatically recognizes other authentication types, such as private key password request or the need for a security token PIN:

Password-protected RSA private key, and now you’re able to change your private key password if you wish.
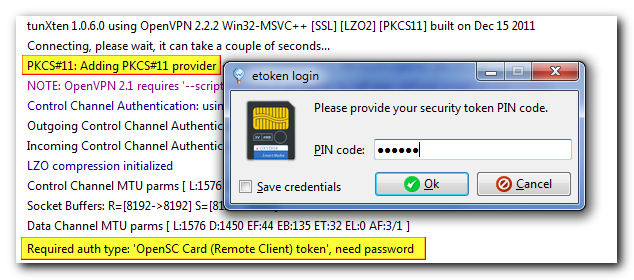
Connection requires entering a PIN code for your security token.
User friendliness kicked up a notch :)
This release has no new killer features included, just a couple of small enhancements:
Now tunXten doesn’t show a message box when it discovers an already running instance, it just tells this instance to reveal itself, this is how it looks like:
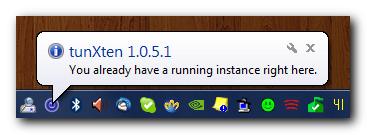
Another useful improvement – the connection log status bar now shows sent/received bytes count using human-friendly byte multiples:

And one more new feature worth mentioning is here to help system administrators in deployment tasks: it is now possible to define one-time parameters in an OpenVPN .ini file.
For example, an admin wants to preconfigure some config so that it would show the pinned window only on the first start, and allow a user to change the window location/pinned state afterwards. To do so, it’s necessary to append .initial suffix to an .ini key name, in this case it will look like this:
window.initial=<width>x<height>+<x>+<y>
This value will be used only on the application first start.
Command-line options and remote control interface
That’s right, this release sports very important functionality – now you can control tunXten from command line or even remotely over your network. Yes, it means our little application is now scripting-friendly as of version 1.0.5! It understands a plethora of command-line options, allowing you to perform most of the actions you’ve seen in GUI, but now everything can also be automated. Long story short, here’s a screnshot:
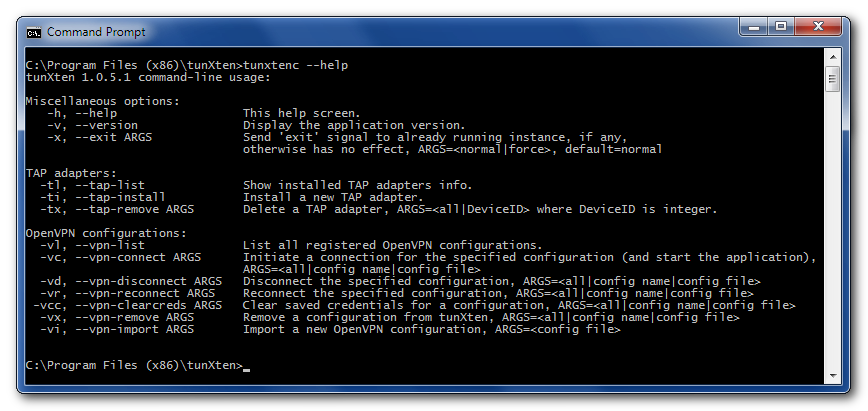
All these options are self-explanatory, and it shouldn’t be hard to get the most out of this new power :)
Moreover, these commands are available via a network socket as a running tunXten instance listens on loopback interface address ‘localhost:5100’ for incoming connections. For example, an excellent TCP network “swiss-army knife” utility called netcat can be used to connect to the application port, just download the netcat binary, place it somewhere in your PATH and enter ‘nc localhost 5100’ in Windows Command Prompt. Once the connection is established, remote control interface greets you and waits for further instructions.
As a matter of fact, tunXten itself utilizes this feature when you run it with some command-line option and it finds an already running instance of itself. In this case it delegates the command execution to the instance over the control socket and displays the response to you.
Another nifty feature is aimed to help system administrators in deployment tasks – it is possible now to define OpenVPN config templates. This is done exactly the same way as described in the Overview, but if a predefined config directory has a “.template” suffix, then it will be copied to a user profile on the application start.
And for a more complete list of changes please refer to the history.txt file distributed with tunXten.
Administrator-friendly control knobs
Addressing our users’ requests, we’ve prepared the next feature release, which now satisfies not only ordinary users’ demands, but is also targeted at system administrators.
So, what’s new for both users and admins out there?
Users now have more control over their OpenVPN configurations as there’s a context menu available for any config, which allows clearing previously saved credentials, deleting the config or exiting the application right away without resorting to the Exit button in the main toolbar. Also it is now possible to tell tunXten to stop showing warnings in its tray balloon, which appears when a connection is established – check out new option on General tab in settings.
However, it’s system administrators who benefit the most from the new release, which brings extreme ease of deployment in corporate environment. There’s so much to tell about new things available to admins, please follow the link to the new overview chapter.
We hope you’ll enjoy the new features.
The first feature release 1.0.3 is out
The first feature release is available now, here’s what’s new:
- Added : Different Windows notification area icons depending on connection states.
- Added : Configuration-specific shortcuts can now be rearranged with drag-and-drop.
- Added : Shortcuts can now be set to auto-launch after a connection is made (use Ctrl+Click).
- Added : Any file can now be dropped on a config window – a shortcut is automatically created.
- Updated: Import procedure improved.
- Updated: Installer now silently updates/installs TAP adapter drivers without system warnings.
Also don’t forget to check the updated overview, it has some details on the new changes.
Bugfix release 1.0.1 available
We’ve prepared the first bugfix release. Here is the list of changes:
- OpenVPN updated to version 2.2.2 (available only in installer).
- Fixed: Sometimes certificate/keys are not imported.
- Fixed: Config comments are intermittently treated as keywords.
- Fixed: Possible crash when closing the application having many connections established at the same time.
- Fixed: Missing certificates/keys causing infinite loops during connection.
- Fixed: Crash when there’s a single empty “sample” directory in APPDATA\tunxten.
Please note that this release includes an updated version of OpenVPN which requires newer TAP drivers, so it’s highly recommended to use our installer available by clicking on the download link. Autoupdate will not upgrade the OpenVPN binaries, only the client executable is upgraded to version 1.0.1
We are finally ready to roll!
We proudly present the very first version of our new software – tunXten, an OpenVPN GUI client that is amazingly easy to use. We put a lot of thought and effort into it and now we feel it’s time to share our achievements with everyone. Feel free to download and use tunXten, we hope it will make your life a little bit easier.
Surely, if you find a bug or have a suggestion on how to improve tunXten, don’t hesitate and drop a note or post it in the forum, we would love to hear from you and thus make our software better. Every opinion counts!